iPad-friendly Materials: 5 tips
Sebah Al-AliIn a previous post, we discussed SoftChalk, a helpful e-authoring tool that allows you to create iPad-friendly activities. SoftChalk documents are automatically created to be responsive, that is, its design and layout adapts automatically to suit the kind of device and size of screen its viewed on. However, if you want to create your own materials, these are a few tips to keep in mind when creating documents to be used on iPads.
Tip 1: Don’t forget screen dimensions
Most of us create materials on laptops or desktops. Unless you keep in mind iPad’s smaller screens (especially with portrait orientation), your documents might not look as appealing when viewed and/or used on an iPad. The best way to address these different sizes with static content, like PDF documents and presentations, is to maintain a one-column layout. Take Facebook as an example and compare its website layout VS its iOS layout.


Same thing goes for any other social media tool or this newsletter! –try viewing it on an iPad with different orientations (:
Tip 2: Use common file types
Although our students must have all apps that are needed to view and author documents of various types, the less apps you require students to use when viewing your documents the better it is. It’s best to use formats that are natively read by iPads’ basic apps. For example, unless certain apps are installed, a user cannot view an AVI video or a compressed file (ZIP or RAR) on an iPad.
The iPad supports a few formats, but the usual recommended formats for mobile documents are PDF documents, JPG pictures, MP4 videos, and MP3 audios. To convert audios, you can use Online Audio Converter. To convert videos, you can use Online Video Converter. To convert documents, you can use Online PDF Converter.
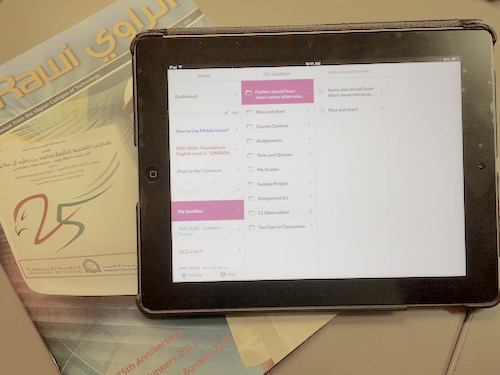
Tip 3: Name your documents smartly!
Whether it is an attached image or a PDF file viewed via Adobe Reader, file names do make a big difference. See the difference between these two ways of naming files (click on an image to enlarge):
Which one is easier for you to identify faster and easier? Naming your files in ways that identify what they include/cover will save you a lot of time when you want to or reuse a certain document. Students also need sometimes to go back to certain documents, for an exam or when you ask them. It is also a lot easier for them to find/look for a present continuous document that is named Grammar_Week3_present_continuous.pdf for example, than to look for a document called: pre_cont(3).pdf.
Another consideration to keep in mind is BlackBoard’s Mobile Learn app. Folder and items that have long names won’t be viewed properly. Try to keep their names as short as possible.
Tip 4: Avoid large sizes
Large files take forever to download, and take up a lot of much needed space on iPads. They also tend to lag and not respond promptly when viewed on different apps. It is best to keep your files as small as you can, maybe not larger than 3-5 MBs. If your files end up being larger than that, try to:
- resize your images, make them smaller. You can do it using any image editor on your computer, or you can use this website to resize and optimize your images: Simple Image Resizer.
- optimize your videos and audios; they don’t have to be high quality. You can use your own YouTube account to upload your videos (you can make your videos private). You can use SoundCloud to share your audio files online.
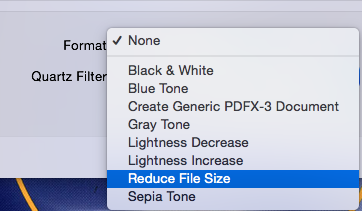 reduce the size of your PDF file. You can use Small PDF to do that, or if you’re using a Mac, you can reduce a PDF file’s size using Preview. From the File menu, choose Export. Then choose Reduce File Size from the Quartz Filter dropdown menu at the bottom
- … and, if all fails, try to break down your one big document into smaller documents, part 1, part 2 and so on.
Tip 5: Use the iPad
Although it could be a lot easier to use PDF documents to deliver content, these documents do not fully utilize the iPad as an m-learning tool. Try to use the different iPad features like mobility, touch, and camera to make your content more interactive and student-friendly. For example, why ask students to google pictures if you can have them move and take their own pictures? Don’t worry about finding the right picture; you’ll be surprised how creative and artistic they can be!
There are many free apps that can make students’ learning more inviting and lively. You can use Weebly for writing portfolios and big projects. To learn more about it, you can can view Peter Water’s webinar sharing his Weebly experience here: link. You can also use Keynote in an interactive manner to make a boring lesson more lively and student-driven. Sarah Whittaker showed us how in one of her creative webinars: link.
You have more?
If you’ve got more ideas or techniques that helped you create a more iPad-friendly classroom, share your tips and tricks. Login and add your comments! To learn how, view this video: How to add comments.